I am not sure if this would be better suited for any other topic section in the forum so please feel free to move it or to point me in the right direction…
As the thread title says, we (currently Filip Janiak and me, at the University of Sussex) are re-visiting the substage part of 2 photon microscopes, in hopes to make them more efficient, customisable, affordable and of course, Open Source.
In our current design, we are using a delta stage to hold and position our sample. The stage will be connected to the substage part of the collection path and we would like to hook up the control part of the stage to software used by a lot of users in our field. Namely, ScanImage (this is not completely open, nor it would be my first choice, but we are trying to make the integration as seamless as possible for users).
We tested some things already using a motorised version of the stage connected to the “standard” drivers of the recommended motors connected to an Arduino Nano, and issuing commands over the serial port using the Arduino IDE.
Now, we would like to move on to integrating things, which leads me to the following questions:
What is the current stable/mature version of the Sangaboard? v0.3 or v0.4?
Assuming control of the board works by sending serial commands to it, what would you recommend for integration with 3rd party software? Should we get a RPi, connect it to the Sangaboard and then use ScanImage to interact with the Pi? or a simple connection between the Sangaboard to ScanImage would be the most straightforward way to do things?
Welcome to the Forum. I don’t know about the needs of 2-photon microscopy in particular. The Sangaboard versions are still v0.X so not stable or mature. However they are really just a different form-factor for an Atmega microcontroller running the Arduino bootloader - so the ‘nano + motor controllers’ version is no different in function. Sangaboard v0.4 contains useful power supply elements to tidy up overall supply to the microscope and the Pi.
Connecting directly would seem to make most sense - the connection from the Pi to the Arduino will be serial anyway. If you want to use a different interface, the Pi can do a conversion - for example the Openflexure Server gives you access to move commands using web requests.
The reason I asked about the Sangaboard version is that I read on a couple of other threads that v0.4 still had some bugs that had to be ironed out? Is that now resolved? (granted the messages reporting the bugs are from ~1year ago, but I did not see other messages stating that v0.4 was the preferred version nowdays)…
v0.4 did have some bugs that ended up taking a long time to find. I believe the latest iteration now works, but I don’t know whether any changes are reflected in the Kitspace listing.
None of the Sangaboards have been widely available, but all being well that will change. v0.4 being in Pi HAT form factor is particularly useful for keeping things tidy, and tidy helps reliability. Unfortunately having a custom board is likely to be more costly than using a generic Arduino because of smaller volumes.
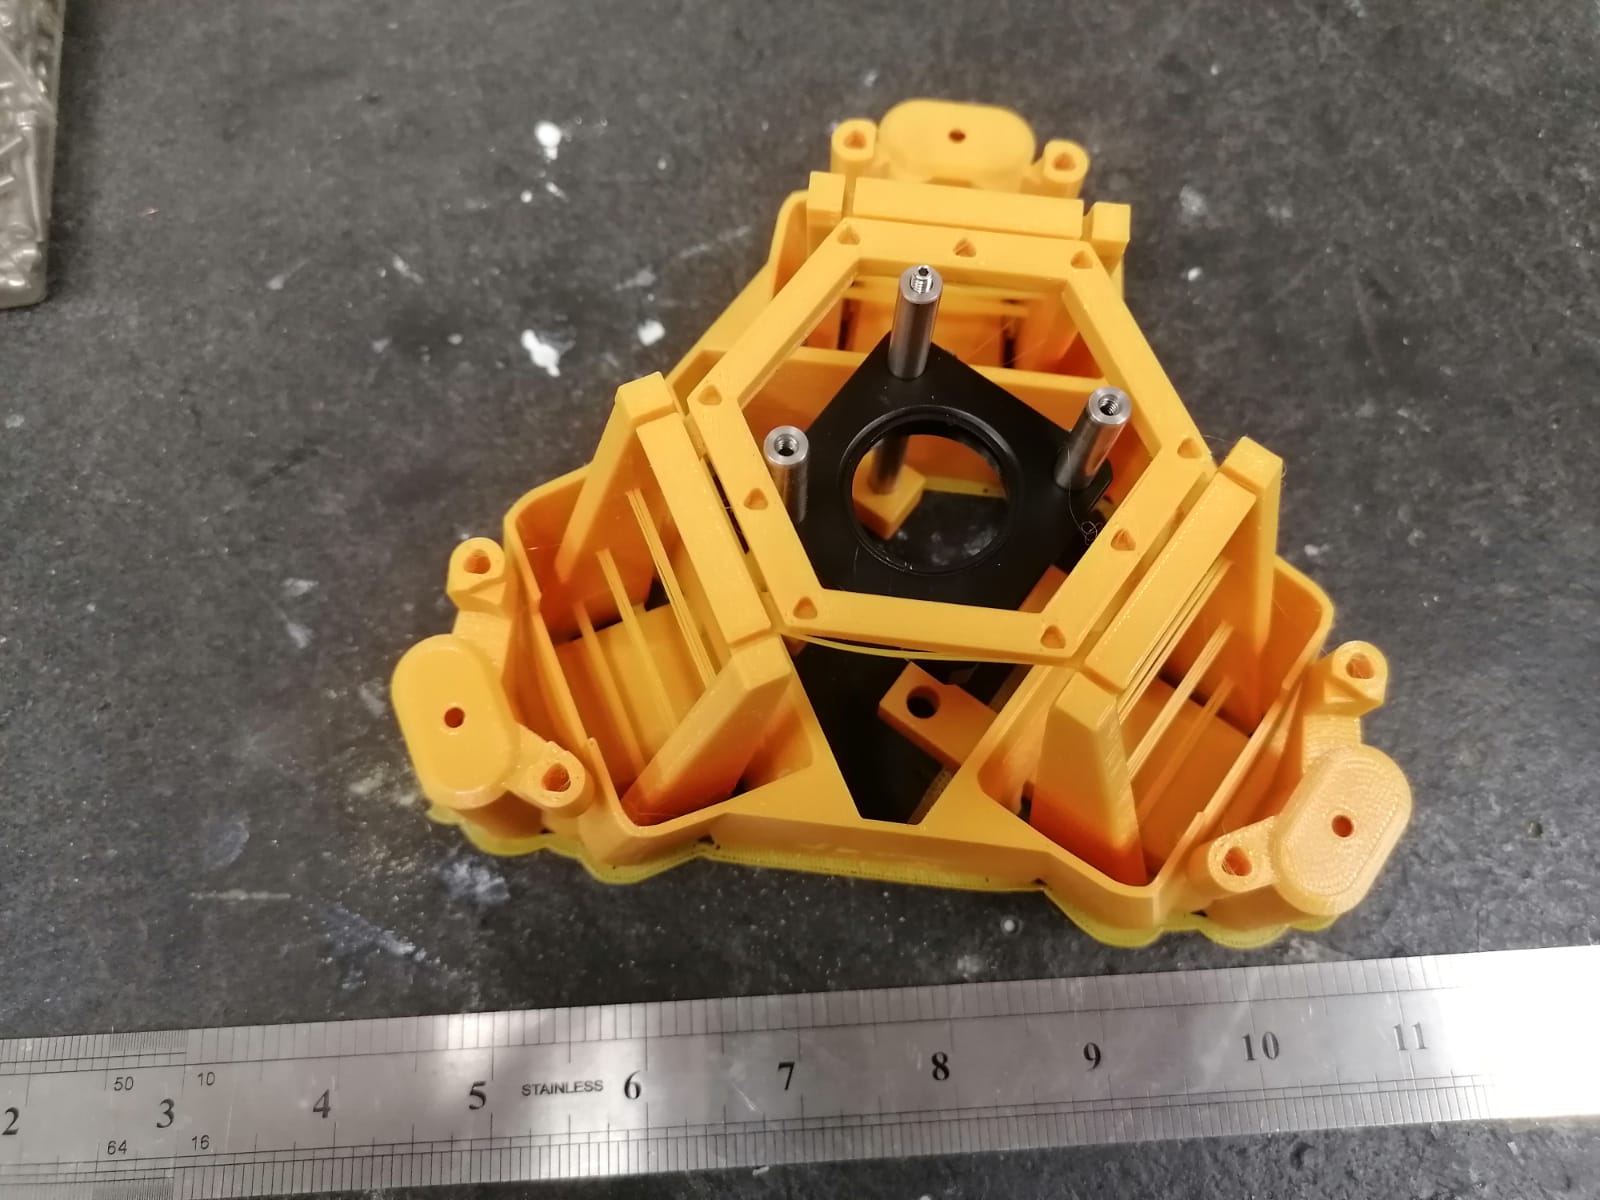
~2 years later, same project, different question : we are now trying to make the delta stage a bit wider than it is currently, so that we can slide some thorlabs bit below the moving stage (the parts will be stationary).
I have managed to “install” all scad dependencies locally, and play around with some of the parameters on the stage, but did not manage to change things in a sensible way to make the stage wider… I wonder if people have tried something like this? Or if they have pointers on how to go about it? @samuelmcdermott (sorry pinging you as I think I remember a conversation with @r.w.bowman a long time ago, about you developing some of the scad for the delta stage?)
In the Deltastage the parameter stage_r is defined on line 10 of parameters.scad. This is intended to set the positions of everything around the Delta stage, so that if it is changed all of the actuators and the stage top and casing should move correctly. The normal stage uses stage_r = 25, try `= 30’ and see what happens.
Have you been able to build the un-modified Delta stage from the source SCAD? It needs a copy of the microscope repository for many functions, but that copy needs to be the correct version from an old commit. It is not automatically cloned if you clone the delta_stage repository, but Git does know which version is required and it is reasonably straight forward to get it to load - at least I managed it, but I forget how.
(The Sangaboard took a lot longer to move forward that I had anticipated in my replies earlier in this thread. v0.4 was never successful, but there is now a Sangaboard v0.5 thanks to @filip.ayazi which is based on the microcontroller from the Rasperry Pi Pico rather than the Atmega microcontrollers. It ends up being lower cost and works well)
I had a quick play with it. The stage is formed of three parts legs(), moving_stage() and casing(). The legs() and moving_stage() respond as expected to changing stage_r. The casing() part seems to have some difficulty building even at the standard size. When stage_r is increased it does not expand as expected. The definition and use of casing_radius does not work if the size is changed, but I am also having trouble compiling the full casing for the standard size stage at present.
Regarding the sangaboard, yeah, learned the hard way that there was some trouble with v0.4… we are currently using a custom solution for this (which just means wiring a couple of ULN2003 to an ESP32). For other projects, we did order v0.5 and that works great!
now, about modding the delta stage: thanks for the tips on the variables to change. I played around with it a bit here and initially had problems rendering the unchanged stage too, but then remembered that this was related to the way OpenScad caches things (I don’t remember where I found this info, maybe it was somewhere here in the forum?)… by going to “design” menu and “flush caches” I was able to render things properly. - I suspect this has not been an issue on the production side of the files (the ones people can download from the documentation pages) because those are rendered using command line, which calls a new openscad instance every time (therefore no caches?) or even generates a virtual env. every time (and again no caches?)
So after a bit of playing around, I used the following parameters (copied to the delta_stage.scad file after the “use” calls )
stage_r = 30; // distance from the centre to the edge of the stage
//Objective mount - the dovetail for attaching the optics module
optics_module_mount = false;

// Stage connectors - the mounts to connect the stage to the base
stage_connectors = true;


//Casing
casing_height = actuator_h+actuator_travel + 5; //flex_z2-24; //the maximum height of the lever casing and 'joining together' casing
casing_radius = nut_y+3; //the outside radius (to the point) of the hexagon used to join the casing together
This generates some warnings, but I could not see any major changes in the design itself… so prob. going to print one out today and see how it behaves…
Once this is done, we will test under our scopes how well it behaves in terms of movement amplitude and repeatibility of movement… can keep people posted as we go along…
Another quick update:
The stage connectors on this larger delta stage does not scale properly, so we were not able to properly attached the stage to our scope. so we observed some drift in Z axis…
Going forward we are going to try a version of the traditional stage (after a conversation with Richard), so next steps are getting a larger version of that, with proper connectors, and test again…
What do you mean by the stage connectors? The mounting holes at the bottom to attach the body to other things, or the mounting holes on the hexagonal top?
When I print the unmodified delta stage, they come out in such way that I can attach a set screw, and have a thorlabs pole attached to it, which in turn I can attach to the antivibration tables we have in the lab… in this new expanded delta, they end up being to close to the delta body, so even though the screws could still go in, the pole does not fit…
Hello, I am also part of the open2p project - please let me know if I should make a new thread for this…? Testing the scaled-up stage we have found the um/step conversion (for XY) comes out at approximately 5.3um/St. I am currently trying to figure out how to bring this back down with the parameters <sample_z> and <XY_gain>. Are there more parameters I could be looking at? I’m not entirely sure how these parameters would affect travel too. I’m hesitant to trial-and-error through this since it takes so much plastic
5.3microns per step seems very large indeed. In fact the modifications made in the posts on this thread should not have made any difference to the motion I think. The actuators are moved apart, but the gearing, the thread pitch and the lever ratios all remain the same.
For motion in z there is no effect from lever ratios, so that should be 500microns (M3 thread pitch) in two turns of the stepper (4000 steps per turn). This is 63nm per step.